Translate

Free Download apk Screen cash Recorder Full android


Screencast Video Recorder 3.2a offline Full APK. screencast captures your phone screen at high frame rates into your high quality mpeg4 video with audio. it might too take snapshots of your respective screen by holding the search key on your private phone. this program includes a gallery out to view, play, rename, delete and share your previously recorded videos or screen shots from inside the very same user interface

Click > Water

Escape Plan (2013)


Movie Name : Escape Plan (2013)
Category : Hollywood Movies
Source : SCAM
Release Date : 18 October 2013
Genre : Action | Mystery | Thriller
Starcast : Sylvester Stallone, Arnold Schwarzenegger, 50 Cent
Description : -

Download :
Click Here To Download Part 1
Click Here To Download Part 2

Free Download Movie Insidious 2


File Name : Insidious: Chapter 2
File Type : MKV
File Size : 524 MB
Duration : 1 Hour 40 Minutes
Source: CAM
Resolution: 720 P
Download : Insidious: Chapter 2
Alternate : Server 2 | Server 3 | Server 4 |Server 5

Shortcut Keys 3ds max

HotkeyDescription
AToggle Angle Snap on/off.
BChange active viewport to "Bottom" view.
CChange active viewport to "Camera" view (there must be at least 1 camera in your scene for this command to work). If you have more than 1 camera in your scene, this will toggle between cameras.
DDisable view (prevents view from updating; used when editing very large scenes to improve performance)
ESelect and rotate.
FChange active viewport to "Front" view.
GToggle grid on/off.
HSelect by name.
ICenter active viewport to the mouse's position.
JShow hide selection brackets
LChange active viewport to "Left" view.
MOpen the Material Editor.
NToggle Auto Key on/off.
OAdaptive degradation, shows objects as boxes, speed up viewport drawing in complex scenes
PChange active viewport to "Perspective" view.
RSelect and Scale.
SToggle Snap on/off.
TChange active viewport to "Top" view.
UChange active viewport to "User" view.
WSelect and move.
XHide/unhide gizmo.
ZZoom Extents All Selected.
6Particle View (v6 & 7 only).
7Polygon Count (displayed at upper left of viewport for selected object).
8Environment panel.
0Render to texture
SpaceLock selection
Up arrowWalkthrough mode
MMBPan view
Ctrl+MMB2x Pan speed
Ctrl+ASelect all
Ctrl+IInvert selection
Ctrl+VClone selected Object
Ctrl+C(this is not copy!)(in perspective viewport) create target camera using the curent view.
Ctrl+XeXpert Mode
Ctrl+ZUndo
Ctrl+YRedo
Ctrl+LMB(click)Add clicked object to current selection
Ctrl+LMB(hold)Marquee, Add multiple selected to current selection
Alt+LMB(click)Remove clicked object from current selection
Alt+LMB(hold)Marquee, Remove multiple selected from current selection
Shift+LMB(click)Clone selected/clicked object
Shift+LMB(click+drag)(with move selected) Clone and move selected/cliced object
Alt+MMBRotate View
Alt+XXray view mode
Alt+QIsolates the selected objects
Alt+wMaximize viewport toggle
Description Keyboard shortcut 

Snaps Action Table 
Snap To Edge/Segment Toggle  Alt+F10  
Snap To Endpoint Toggle  Alt+F8  
Snap To Face Toggle  Alt+F11  
Snap To Grid Points Toggle  Alt+F5  
Snap To Midpoint Toggle  Alt+F9  
Snap To Pivot Toggle  Alt+F6  
Snap To Vertex Toggle  Alt+F7  
Main UI 
Adaptive Degradation Toggle  O  
Align  Alt+A  
Angle Snap Toggle  A  
Arc Rotate View Mode  Ctrl+R  
Auto Key Mode Toggle  N  
Background Lock Toggle  Alt+Ctrl+B  
Backup Time One Unit  ,  
Bottom View  B  
Camera View  C  
Clone  Ctrl+V  
Cycle Active Snap Type  Alt+S  
Cycle Selection Method  Ctrl+F  
Cycle Snap Hit  Alt+Shift+S  
Default Lighting Toggle  Ctrl+L  
Delete Objects  .  
Disable Viewport  D  
Display as See-Through Toggle  Alt+X  
Environment Dialog Toggle  8  
Expert Mode Toggle  Ctrl+X  
Fetch  Alt+Ctrl+F  
Forward Time One Unit  .  
Front View  F  
Go to End Frame  End  
Go to Start Frame  Home  
Hide Cameras Toggle  Shift+C  
Hide Geometry Toggle  Shift+G  
Hide Grids Toggle  G  
Hide Helpers Toggle  Shift+H  
Hide Lights Toggle  Shift+L  
Hide Particle Systems Toggle  Shift+P  
Hide Shapes Toggle  Shift+S  
Hide Space Warps Toggle  Shift+W  
Hold  Alt+Ctrl+H  
Isometric User View  U  
Left View  L  
Lock User Interface Toggle  Alt+0  
Material Editor Toggle  M  
Maximize Viewport Toggle  Alt+W  
MAXScript Listener  F11  
New Scene  Ctrl+N  
Normal Align  Alt+N  
Open File  Ctrl+O  
Pan View  Ctrl+P  
Pan Viewport  I  
Percent Snap Toggle  Shift+Ctrl+P  
Perspective User View  P  
Place Highlight  Ctrl+H  
Play Animation  /  
Quick Align  Shift+A  
Quick Render  Shift+Q  
Redo Scene Operation  Ctrl+Y  
Redo Viewport Operation  Shift+Y  
Redraw All Views  `  
Render Last  F9  
Render Scene Dialog Toggle  F10  
Restrict Plane Cycle  F8  
Restrict to X  F5  
Restrict to Y  F6  
Restrict to Z  F7  
Save File  Ctrl+S  
Scale Cycle  Ctrl+E  
Select All  Ctrl+A  
Select Ancestor  PageUp  
Select and Move  W  
Select and Rotate  E  
Select By Name  H  
Select Child  PageDown  
Select Children  Ctrl+PageDown  
Select Invert  Ctrl+I  
Select None  Ctrl+D  
Selection Lock Toggle  Space  
Set Key Mode  '  
Set Keys  K  
Shade Selected Faces Toggle  F2  
Show Floating Dialogs  Ctrl+`  
Show Main Toolbar Toggle  Alt+6  
Show Safeframes Toggle  Shift+F  
Show Selection Bracket Toggle  J  
Snap To Frozen Objects Toggle  Alt+F2  
Snaps Toggle  S  
Snaps Use Axis Constraints Toggle  Alt+D, Alt+F3  
Sound Toggle  \  
Spacing Tool  Shift+I  
Spot/Directional Light View  Shift+4  
Sub-object Level Cycle  Insert  
Sub-object Selection Toggle  Ctrl+B  
Top View  T  
Transform Gizmo Size Down  -  
Transform Gizmo Size Up  =  
Transform Gizmo Toggle  X  
Transform Type-In Dialog Toggle  F12  
Undo Scene Operation  Ctrl+Z  
Undo Viewport Operation  Shift+Z  
Update Background Image  Alt+Shift+Ctrl+B  
View Edged Faces Toggle  F4  
Viewport Background  Alt+B  
Virtual Viewport Pan Down  NumPad 2  
Virtual Viewport Pan Left  NumPad 4  
Virtual Viewport Pan Right  NumPad 6  
Virtual Viewport Pan Up  NumPad 8  
Virtual Viewport Toggle  NumPad /  
Virtual Viewport Zoom In  NumPad +  
Virtual Viewport Zoom Out  NumPad -  
Wireframe / Smooth+Highlights Toggle  F3  
Zoom Extents All Selected  Z  
Zoom Extents All  Shift+Ctrl+Z  
Zoom Extents  Alt+Ctrl+Z  
Zoom In 2X  Alt+Shift+Ctrl+Z  
Zoom Mode  Alt+Z  
Zoom Out 2X  Alt+Shift+Z  
Zoom Region Mode  Ctrl+W  
Zoom Viewport In  [, Ctrl+=  
Zoom Viewport Out  ], Ctrl+-  
Track View 
Add Keys  A  
Apply Ease Curve  Ctrl+E  
Apply Multiplier Curve  Ctrl+M  
Assign Controller  C  
Copy Controller  Ctrl+C  
Expand Object Toggle  O  
Expand Track Toggle  Enter, T  
Filters  Q  
Lock Selection  Space  
Lock Tangents Toggle  L  
Make Controller Unique  U  
Move Highlight Down  Down Arrow  
Move Highlight Up  Up Arrow  
Move Keys  M  
Nudge Keys Left  Left Arrow  
Nudge Keys Right  Right Arrow  
Pan  P  
Paste Controller  Ctrl+V  
Scroll Down  Ctrl+Down Arrow  
Scroll Up  Ctrl+Up Arrow  
Snap Frames  S  
Zoom Horizontal Extents Keys 
 Alt+X  
Zoom  Z  
Material Editor 
Background  B  
Backlight  L  
Cycle 3X2, 5X3, 6X4 Sample Slots  X  
Get Material  G  
Go Backward to Sibling  Left Arrow  
Go Forward to Sibling  Right Arrow  
Go to Parent  Up Arrow  
Make Preview  P  
Options  O  
Schematic View 
Add Bookmark  B  
Display Floater  D  
Filters  P  
Free All  Alt+F  
Free Selected  Alt+S  
Invert Selected Nodes  Ctrl+I  
Move Children  Alt+C  
Next Bookmark  Right Arrow  
Previous Bookmark  Left Arrow  
Rename Object  R  
Select All Nodes  Ctrl+A  
Select Children  Ctrl+C  
Select None  Ctrl+D  
Show Grid  G  
Toggle Shrink  Ctrl+S  
Use Connect Tool  C  
Use Select Tool  S  
Zoom Selected Extents  Z  
ActiveShade 
Close  Q  
Draw Region  D  
Render  R  
Select Object  S  
Toggle Toolbar (Docked)  Space  
Video Post 
Add Image Filter Event  Ctrl+F  
Add Image Input Event  Ctrl+I  
Add Image Layer Event  Ctrl+L  
Add Image Output Event  Ctrl+O  
Add New Event  Ctrl+A  
Add Scene Event  Ctrl+S  
Edit Current Event  Ctrl+E  
Execute Sequence  Ctrl+R  
New Sequence  Ctrl+N  
NURBS 
CV Constrained Normal Move  Alt+N  
CV Constrained U Move  Alt+U  
CV Constrained V Move  Alt+V  
Display Curves  Shift+Ctrl+C  
Display Dependents  Ctrl+D  
Display Lattices  Ctrl+L  
Display Shaded Lattice  Alt+L  
Display Surfaces  Shift+Ctrl+S  
Display Toolbox  Ctrl+T  
Display Trims  Shift+Ctrl+T  
Local Select Sub-Object By Name  Ctrl+H  
Lock 2D Selection  Space  
Select Next in U  Ctrl+Right Arrow  
Select Next in V  Ctrl+Up Arrow  
Select Previous in U  Ctrl+Left Arrow  
Select Previous in V  Ctrl+Down Arrow  
Select Sub-Object By Name  H  
Set Tessellation Preset 1  Alt+1  
Set Tessellation Preset 2  Alt+2  
Set Tessellation Preset 3  Alt+3  
Soft Selection  Ctrl+S  
Switch To Curve CV Level  Alt+Shift+Z  
Switch To Curve Level  Alt+Shift+C  
Switch To Imports Level  Alt+Shift+I  
Switch To Point Level  Alt+Shift+P  
Switch To Surface CV Level  Alt+Shift+V  
Switch To Surface Level  Alt+Shift+S  
Switch To Top Level  Alt+Shift+T  
Transform Degrade  Ctrl+X  
Editable Poly 
Bevel Mode  Shift+Ctrl+B  
Border Level  3  
Chamfer Mode  Shift+Ctrl+C  
Connect  Shift+Ctrl+E  
Constrain to Edges  Shift+X  
Cut  Alt+C  
Edge Level  2  
Element Level  5  
Extrude Mode  Shift+E  
Face Level  4  
Grow Selection  Ctrl+PageUp  
Hide Unselected  Alt+I  
Hide  Alt+H  
Object Level  6  
Quickslice Mode  Shift+Ctrl+Q  
Repeat Last Operation  ;  
Select Edge Loop  Alt+L  
Select Edge Ring  Alt+R  
Shrink Selection  Ctrl+PageDown  
Unhide All  Alt+U  
Vertex Level  1  
Weld Mode  Shift+Ctrl+W  
Edit/Editable Mesh 
Bevel Mode  Ctrl+V, Ctrl+B  
Chamfer Mode  Ctrl+C  
Cut Mode  Alt+C  
Detach  Ctrl+D  
Edge Invisible  Ctrl+I  
Edge Level  2  
Edge Turn  Ctrl+T  
Element Level  5  
Extrude Mode  Ctrl+E  
Face Level  3  
Polygon Level  4  
Vertex Level  1  
Weld Selected  Ctrl+W  
Weld Target Mode  Alt+W  
Edit Normals 
Break Normals  B  
Copy Normal  Ctrl+C  
Edge Level  Ctrl+3  
Face Level  Ctrl+4  
Make Explicit  E  
Normal Level  Ctrl+1  
Object Level  Ctrl+0  
Paste Normal  Ctrl+V  
Reset Normals  R  
Specify Normals  S  
Unify Normals  U  
Vertex Level  Ctrl+2  
FFD 
Switch To Control Point Level  Alt+Shift+C  
Switch To Lattice Level  Alt+Shift+L  
Switch To Set Volume Level  Alt+Shift+S  
Switch To Top Level  Alt+Shift+T  
Edit Poly 
Bevel Mode  Shift+Ctrl+B  
Border Level  3  
Chamfer Mode  Shift+Ctrl+C  
Connect  Shift+Ctrl+E  
Constrain to Edges  Shift+X  
Cut  Alt+C  
Edge Level  2  
Element Level  5  
Extrude Mode  Shift+E  
Grow Selection  Ctrl+PageUp  
Hide Unselected  Alt+I  
Hide  Alt+H  
Object Level  6  
Polygon Level  4  
Quickslice Mode  Shift+Ctrl+Q  
Repeat Last Operation  ;  
Select Edge Loop  Alt+L  
Select Edge Ring  Alt+R  
Shrink Selection  Ctrl+PageDown  
Unhide All  Alt+U  
Vertex Level  1  
Weld Mode  Shift+Ctrl+W  
Physique 
Copy Envelope  Ctrl+C  
Delete  Ctrl+D  
Next  PageDown  
Paste Envelope  Ctrl+V  
Previous Selection Level  Shift+  
Previous  PageUp  
Reset Envelopes  Ctrl+E  
Unwrap UVW 
Break Selected Vertices  Ctrl+B  
Detach Edge Verts  D, Ctrl+D  
Edit UVW's  Ctrl+E  
Filter Selected Faces  Alt+F  
Freeze Selected  Ctrl+F  
Get Face Selection From Stack  Alt+Shift+Ctrl+F  
Get Selection From Faces  Alt+Shift+Ctrl+P  
Hide Selected  Ctrl+H  
Load UVW  Alt+Shift+Ctrl+L  
Lock selected vertices  Space  
Mirror Horizontal  Alt+Shift+Ctrl+N  
Mirror Vertical  Alt+Shift+Ctrl+M  
Move Horizontal  Alt+Shift+Ctrl+J  
Move Vertical  Alt+Shift+Ctrl+K  
Pan  Ctrl+P  
Planar map faces/patches  Enter  
Show Seams In Viewport  Alt+E  
Snap  Ctrl+S  
Texture Vertex Contract Selection  NumPad -, -  
Texture Vertex Expand Selection  NumPad +, =  
Texture Vertex Move Mode  Q  
Texture Vertex Rotate Mode  Ctrl+R  
Texture Vertex Weld Selected  Ctrl+W  
Texture VertexTarget Weld  Ctrl+T  
Unwrap Options  Ctrl+O  
Update Map  Ctrl+U  
Zoom Extents Selected  Alt+Ctrl+Z  
Zoom Extents  X  
Zoom Region  Ctrl+X  
Zoom To Gizmo  Shift+Space  
Zoom  Z  
Crowd 
Solve  S  
Biped 
Change Leg State  Alt+Ctrl+S  
Collapse Move All Mode changes  Alt+M  
Copy Posture  Alt+C  
Fix Graphs  Alt+Ctrl+F  
Lock Selected Keys (toggle)  Alt+Ctrl+L  
Paste Posture Opposite  Alt+B  
Paste Posture  Alt+V  
Play Biped  V  
Reset all limb keys  Alt+K  
Scale In Transform (toggle)  Alt+Ctrl+E  
Set Key  0  
Set Range  Alt+R  
Toggle Biped Keys in TrackBar  Alt+T  
TV Select end of footsteps  Alt+D  
TV Select entire foostep  Alt+S  
TV Select start of foosteps  Alt+A  
Biped Curve Editing 
Pos Curve Relative To Bip Root  Ctrl+A  
Pos Curve Relative To World  Ctrl+A  
Show Pos Accel Curve  Ctrl+A  
Show Pos Curve  Ctrl+A  
Show Pos Jerk Curve  Ctrl+A  
Show Pos Speed Curve  Ctrl+A  
Show Quat Curve  Ctrl+A  
Show Rot Accel Curve  Ctrl+A  
Show Rot Speed Curve  Ctrl+A  
Toggle Draw Every Frame  Ctrl+A  
Toggle Layered Edit  Ctrl+A  
Toggle Limit Quat Curve to 180  Ctrl+A  
Toggle Manipulate Subanims  Ctrl+A  
Toggle Show Z  Ctrl+A  
Toggle Show X  Ctrl+A  
Toggle Show Y  Ctrl+A  
Toggle Subanims  Ctrl+A  
Reaction Manager 
Set Max Influence  Ctrl+I  
Set Min Influence  Alt+I  
Particle Flow 
Particle Emission Toggle  ;  
Particle View Toggle  6  
Particle Flow 
Selected Particle Emission Toggle  Shift+;  
Particle Flow 
Copy Selected In Particle View  Ctrl+C  
Paste In Particle View  Ctrl+V  
Select All In Particle View  Ctrl+A  
ActiveShade (Scanline) 
Initialize  P  
Update  U  
ToneOperatorAndRadiosityActionTable 
Advanced Lighting Panel  9  
Object Display Culling 
Object Display Culling  Alt+O  
WalkThrough 
Accelerate Toggle  Q  
Back  S, Down Arrow  
Decelerate Toggle  Z  
Decrease Step Size  [  
Down  C, Shift+Down Arrow  
Forward  W, Up Arrow  
Increase Step Size  ]  
Left  A, Left Arrow  
Level  Shift+Space  
Lock Vertical Rotation  Space  
Reset Step Size  Alt+[  
Right  D, Right Arrow  
Up  E, Shift+Up Arrow  
Macro Scripts 
Add/Edit Parameters... (TV)  Ctrl+1  
Cap (Poly)  Alt+P  
Collapse (Poly)  Alt+Ctrl+C  
Collect Parameters SV  Alt+3  
Collect Parameters TV  Alt+4  
Create Camera From View  Ctrl+C  
Cut (Poly)  Alt+C  
Extrude Face (Poly)  Alt+E  
Geometry Selection Visibility Toggle  Alt+G  
Isolate Selection  Alt+Q  
Meshsmooth (Poly)  Ctrl+M  
Parameter Collector  Alt+2  
Parameter Editor  Alt+1  
Parameter Wiring Dialog...  Alt+5  
Render to Texture Dialog Toggle  0  
Smart Scale  R  
Smart Select  Q  
Start Parameter Wiring...  Ctrl+5  
Sub-Object Level 1  1  
Sub-Object Level 2  2  
Sub-Object Level 3  3  
Sub-Object Level 4  4  
Sub-object Level 5  5  
WalkThrough View Mode  Up Arrow  
Quad Menu Sets 
Animation  [Alt+RMB]  
Custom  [Shift+Ctrl+Alt+RMB]  
Custom  [Shift+Ctrl+RMB]  
Lighting | Render  [Ctrl+Alt+RMB]  
Modeling  [Ctrl+RMB]  
reactor  [Shift+Alt+RMB]  
Snap  [Shift+RMB]  
Viewports  V

Windows 7 - FULL GLASS Transparent theme


Instructions:


1. Copy the content from the FULL GLASS folder [full glass vs7 at full glass vs7.theme] to

C:\Windows\Resources\Themes

2. Install the universal theme patcher, 32bit or 64bit.

3. Restart.

To check your new theme, right click desktop-personalize-installed themes-full glass vs7-apply.


Note:

If it does not show the full glass, copy FULL GLASS.EXE in the START-UP folder.

Only for Windows 7{home, premium, professional and ultimate}
Not working in XP, VISTA and Windows 7 starter.

Click > Water

Free download sherlock holmes 2 2011


Free download Sherlock Holmes 2009


Genre: Action | Adventure | Crime 
Stars: Robert Downey Jr., Jude Law and Rachel McAdams
Quality: BluRay 720p
Encoder: Kill-9@Ganool 
Source: 720p.BluRay.x264.DTS.CBGB

Sinopsis:

After finally catching serial killer and occult “sorcerer” Lord Blackwood, legendary sleuth Sherlock Holmes and his assistant Dr. Watson can close yet another successful case. But when Blackwood mysteriously returns from the grave and resumes his killing spree, Holmes must take up the hunt once again. Contending with his partner’s new fiancée and the dimwitted head of Scotland Yard, the dauntless detective must unravel the clues that will lead him into a twisted web of murder, deceit, and black magic – and the deadly embrace of temptress Irene Adler.

Click > Water
Subtitle > Water

Remove / Delete a account FaceBook

If you’re done with Facebook, you may be running around in circles trying to figure out how to delete your account. They certainly don’t make it easy to find. Follow this guide to make sure that you save all of the data you need and delete your account for good.
 
  1. 1
    Save any data you need. Before you delete your account, save any photos and contact information you need from your account. You will lose access to all of this when you delete your account.
    • You can download a copy of all of your Facebook data through the Account Settings. Click on the Gear icon in the upper-right corner to access it. Click the link that says “Download a copy of your Facebook data”.

    • Download individual pictures by clicking the Download link at the bottom when you open them.

  2. 2
    Clear your Facebook history. You can open the Activity Log to undo all of your previous actions on Facebook, such as liking posts and comments you’ve made. This will help ensure that as little data about you remains as possible after your account is deleted.
    • To access the Activity Log, click the Privacy button in the top-right corner. Select “Who can see my stuff?” Click the link for the Activity Log. Here you can choose which parts of your activity you would like to delete.

  3. 3
    Visit the Delete Account page. This page cannot be accessed through Facebook unless you search for it. You can also follow this link. Click the “Delete my Account” button to start the account deletion process.[1]

  4. 4
    Enter your password and the CAPTCHA. Once you have entered these, press “Okay” to permanently delete your account. You will need to wait 14 days for the deletion to take effect.

    • You need to have access to your Facebook account in order to delete it this way. If you can’t remember your password, use Facebook’s password reset service before deleting your account.
  5. 5
    Try a temporary deactivation instead of deleting your account.
    • Click the Settings icon and select Account Settings.

    • Open the Security section from the left menu.

    • Click the “Deactivate your account” link

    • Fill out the form for deactivating your account. You will still be able to be linked in posts and messaged, though you will not receive notifications about it.

Cara mendaftar di Google ADSENSE

Google adsense saat ini tetap saja menjadi bintang di program Iklan blogger untuk mendapatkan penghasilan, selain terpercaya google adsense juga membayar mahal setiap klik iklan google adsense sehingga mempermudah anda meraup pundi pundi dollar yang tentunya meningkatkan penghasilan bulanan anda hanya dari blog.

selain itu google adsense saat ini juga sudah mendukung konten blog dengan bahasa indonesia, yang pastinya memudahkan kita dalam berburu dollar
bahkan saat ini sudah banyak para blogger indonesia yang mendapatkan penghasilan dari google adsense yang tak kurang dari 100$ per bulan, selain iklan yang variatif, iklan google juga menarik bagi pengunjung tidak seperti iklan dari PPC lokal indonesia yang didominasi obat kuat, dan bisnis online yang membuat kesan blog kita kurang profesional.

sudah tak sabar lagi bergabung dengan google adsense?
Berikut Cara Mendaftar Google Adsense Dengan Mudah :

1. Carilah Menu Earning atau pendapatandi dasbor blogger, jika tidak ketemu anda bisa klik setelan, lalu klik bahasa dan pemformatan, kemudian tukar bahasa keenglish-UK, kemudian klik simpan, setelah itu anda muat ulang laman blogger, pasti menu penghasilan ataupunearnings sudah muncul.

2. kemudian, klik penghasilan ataupunearning, kemudian klik daftar untuk mulai gunakan adsense.
3. maka anda akan dibawa ke halaman seperti di bawah ini pilih YA, cobacoba@gmail.com, atau anda bisa pilih akun baru.


4. setelah itu anda akan diminta memasukkan pasword akun gmail anda atau pasword untuk login ke blog anda. seperti gambar dibawah ini, masukkan pasword yang dipakai untuk login ke blog anda. (jika anda memakai akun gmail blog anda) jika pakai akun google baru masukkan pasword untuk login ke adsense..


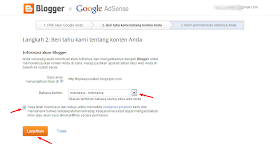
5. kemudian anda akan masuk ke halaman pengisian form adsense seperti gambar di bawah ini.

klik gambar untuk memperbesar

  •  pada kolom bahasa konten : pilih bahasa konten blog anda, jika bahasa indonesia, pilih bahasa indonesia.
  • kemudian centang tanda yang berwarna merah.
  • setelah itu klik lanjutkan.


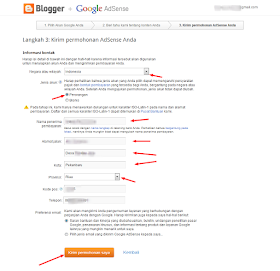
6. setelah klik lanjutkan maka akan keluar halaman seperti gambar dibawah ini, isilah data diri anda dengan lengkap dan benar.


klik gambar untuk memperbesar

  •  kolom negara atau wilayah pilih indonesia.
  • pilih jenis akun perorangn atau bisnis.
  • nama pengguna: cantumkan nama lengkap anda
  • alamat jalan: isilah keterangan alamat lengkap anda.
  • kota: kota domisili anda.
  • provinsi: provinsi anda
  • kode pos: buat kode pos anda
  • telepon: cantumkan nomor handphon anda, jika tak punya telepone.
  • sebelum klik permohonan iklan, baca data anda apakah sudah benar, jika sudah benar klik permohonan iklan untuk melanjutkan.
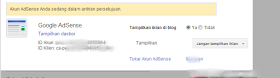
7. setelah klik permohonan iklan berarti akun anda telah dibuat dan dalam proses peninjauan oleh pihak google. seperti gambar dibawah ini.


klik gambar untuk memperbesar
SELESAI, Akun Gooogle Adsense anda sedang dalam peninjauan, bagaimana mudah bukan? selanjutnya sambil menunggu keputusan dari google terkait diterima atau tidaknya anda, anda terus tingkatkan pengunjung dan buat konten berkualitas. karena semakin banyak pengunjung anda maka semakin besar peluang anda diterima.

Search